People who know me know that I’m a macOS fanatic—I’ve used macOS exclusively for everything aside from gaming since 2012 when my dad first got me a MacBook Pro for college. I inherited my friend Andre’s gaming PC when he left the U.S. back in spring 2016 and I’ve done a ton of gaming on that. I even upgraded the GPU (to GTX 1080 Ti) and PSU in that thing to keep up with the gaming load I’m putting on it in order to target 1440p at 144 FPS.
Fast forward to 2018 when my wife and I had to leave the U.S., this same gaming PC was shipped back to Malaysia along with our other belongings. Alas, the motherboard got wrecked during transport—the CPU cooler came off and it dragged some transistors off the motherboard along with it. The only saving grace was that the 1080 Ti graphics card wasn’t in there, I packed it in my handcarry when we were flying back. Disgruntled that I couldn’t get it to POST and feeling lazy at the prospect of having to rebuild a whole system, I sold my 1080 Ti to another friend and got a PS4 Pro instead to satisfy my thirst for the latest games. I’ve since then platinum-ed a few PS4 games: Sekiro, God of War, Spider-Man… it was all really good fun. Then one day, I decided I’ve had enough when I was compiling a large-ish Android Studio project on my 2015 MacBook Pro (quad-core i7, 16GB RAM, top-of-the-line back in the day).
Why?
I’ve had enough of my Mac’s fan spinning up and sounding like a jet plane taking off just because I have Slack and Chrome open. I’ve had enough of the Mac thermal throttling while building a large project. I’ve had enough of PS4 games running like shit on my PS4 Pro. I’ve had enough of having to pay a yearly subscription just so I can use online functionalities like multiplayer on my PS4 Pro.
I needed something quieter and a lot more powerful, and I’m not going to pay Apple a fortune just to get an iMac Pro or a new MBP (with keyboard problems, mind you), or pay them a fortune and some kidneys to get a modular and upgradeable option called the new Mac Pro.
Aside from running Xcode, I came to the realization that everything else I use or do can be migrated over to Windows, so building a high performance PC that I can use to work and game sounded like a no-brainer. I decided to take the plunge.
Parts
When it came to deciding on parts, I knew I should avoid cheaping out. I wanted something that is super fast, but not state-of-the-art fast—I wanted to pay 50% for something that’ll get me 90% of the way there, rather than paying 100% for something that’ll get me 100% of the way there. I also wanted to go with a modest, tasteful amount of RGB lighting that’s not too over the top that’ll make the PC a pleasure to look at every day.
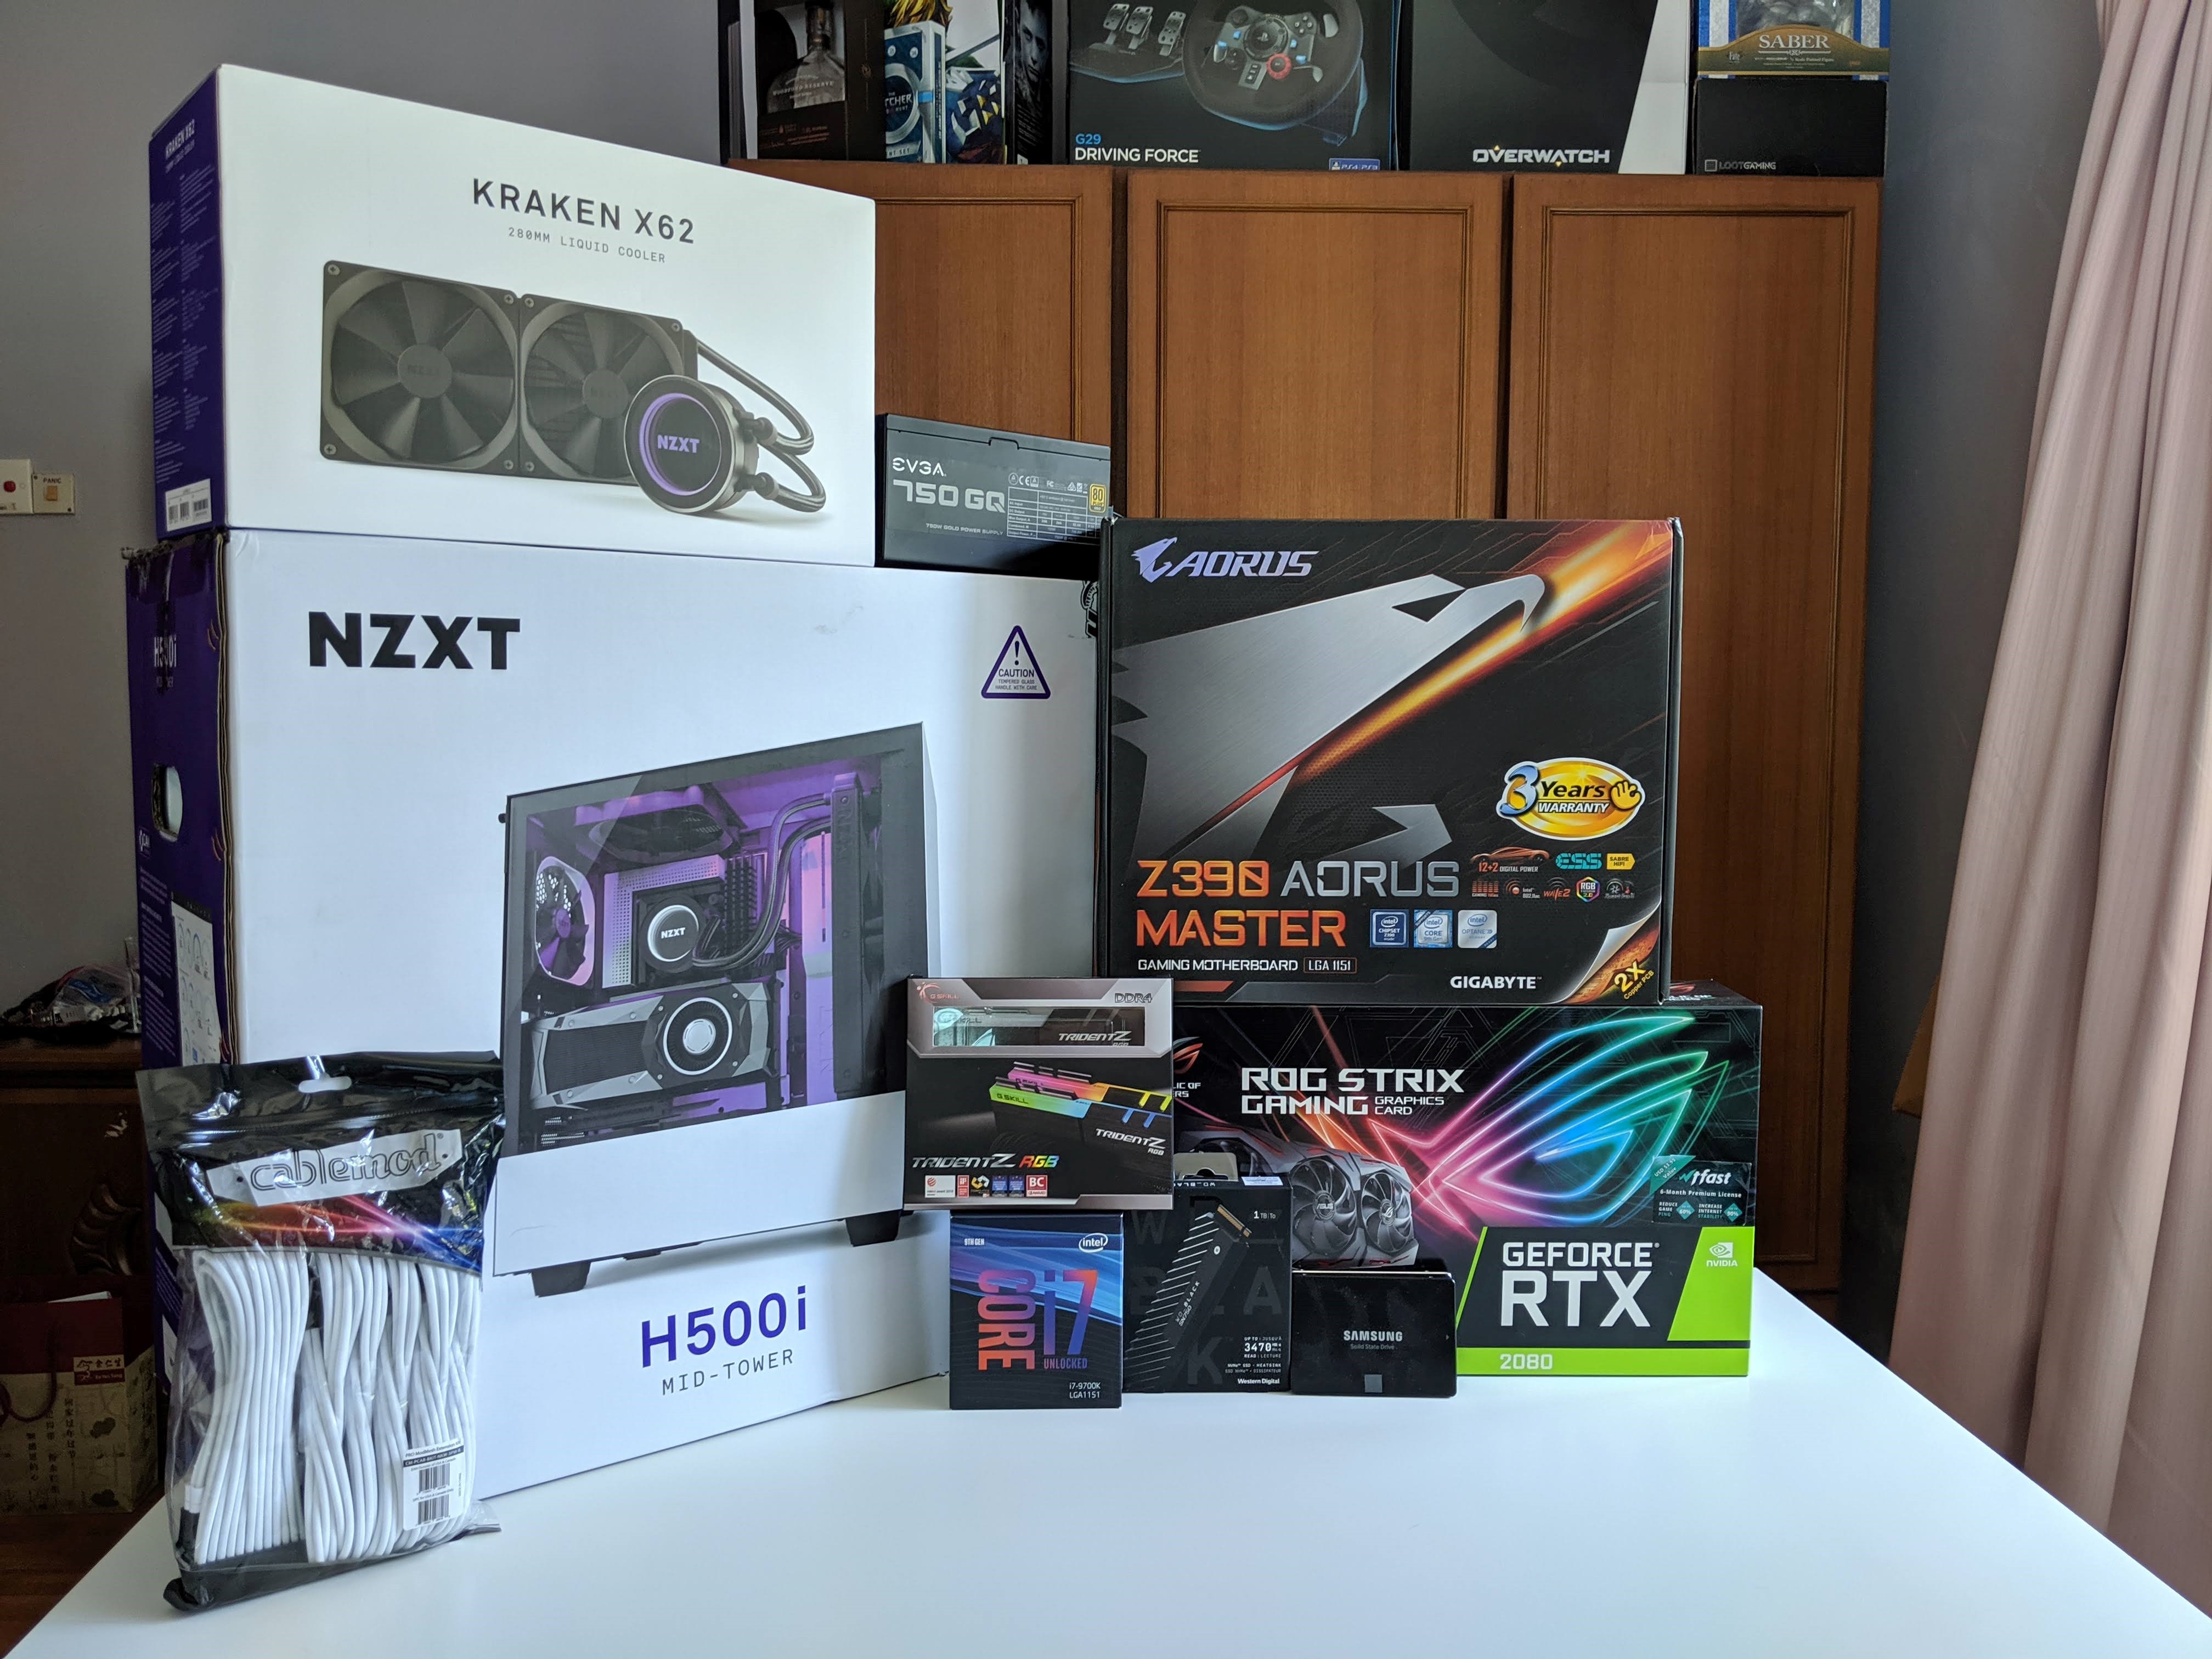
PCPartPicker was essential during this phase, it’s a great website that allows you to mix and match parts, and they even tell you if there are parts are incompatible with one another, for example if a GPU is too big for a certain case. I ended up with this PCPartPicker list.
The total damage for everything on that list came up to about $2,500 for me, because some things are more expensive here in Malaysia than they are in the U.S.. This is more than acceptable in my book, because the base model of the 2019 15” MacBook Pro costs $2,399 and was also what I was ready to pay if it could solve all the problems I was complaining about.
Processor/CPU
My MacBook Pro has a quad core 2.4 GHz i7, but I don’t think it ever turbos to its maximum potential of 3.x GHz for a sustained period of time due to the horrible thermals in the unibody MBPs. The i7-9700K has eight cores and a 3.6 GHz base clock that turbos up to 4.9 GHz. The i9-9900K which is a tier above it is roughly 30% more expensive for twice the thread count (16 vs. 8) with the same physical core count. I figured the 9900K would be a beast to cool and I’d rather spend my money on some other upgrades, so I went with the 9700K in the end.
CPU cooler
I decided I didn’t want a big chunky air cooler sitting on top of my CPU, and so for aesthetics reasons I went with the NZXT Kraken X62 all-in-one liquid cooler. This is my first AIO liquid cooler so I was a bit apprehensive at first because of some horror stories about the pipes bursting and destroying the whole build and whatnot, but I wanted something that’s reasonably quiet, looks cool and has RGB lighting, and the X62 checks all those boxes.
Motherboard
Nothing much to elaborate on here. I went with the Gigabyte Z390 AORUS Master ATX motherboard because it has decent overclocking support, onboard Wi-Fi, integrated lighting and good reviews. It also has some fancy features like a dedicated audio USB port that supposedly delivers better-sounding audio, and the USB connectors going to the front of the case would have support for fast-charging iOS and Android devices.
Memory/RAM
At first I told myself 16GB would be enough, but when the 32GB kit is only slightly more expensive thanks to the dropping RAM prices, I was like, “why the heck not” and ultimately went with the G.Skill Trident Z DDR4-3200MHz kit. The RGB was the icing on the cake at that point.
Graphics card/GPU
Coming from a GTX 1080 Ti and having a 1440p 144 Hz monitor, I knew I had to get something at least as good as the 1080 Ti that I sold off in order to hit my target of running most games at 1440p 144 FPS. That left me with the RTX 2080 or the RTX 2080 Ti (the Super cards weren’t out then). Having splurged on a Ti card before, I decided it wasn’t worth my money this time around since I’m still using the same monitor and not a 4K setup, so I went with the RTX 2080, and since I’ve had a great experience with ROG Strix, I ended up with the ROG Strix 2080 card that came with a slight factory overclock and excellent thermals.
Power supply (PSU)
This is the only part that I reused from the old PC that was transported back when we left the U.S., it’s an EVGA 750W power supply, plenty of headroom for my current setup (again, PCPartPicker was instrumental in allowing me to calculate the total power draw of my setup).
Storage/SSD
M.2 SSDs look like a very small stick of RAM, and they’ve really taken off these past few years and becoming more affordable to the masses. There are also NVMe variants of M.2 SSDs that are supposedly faster and more reliable. I went into a local store to see what they had in stock and I was recommended the WD Black 1 TB M.2 NVMe SSD. I thought it looked super cool with the integrated heat sink so I went with it, knowing that my motherboard has a couple more M.2 slots that I can use in the future if I run out of space on this 1 TB SSD.
Tower case
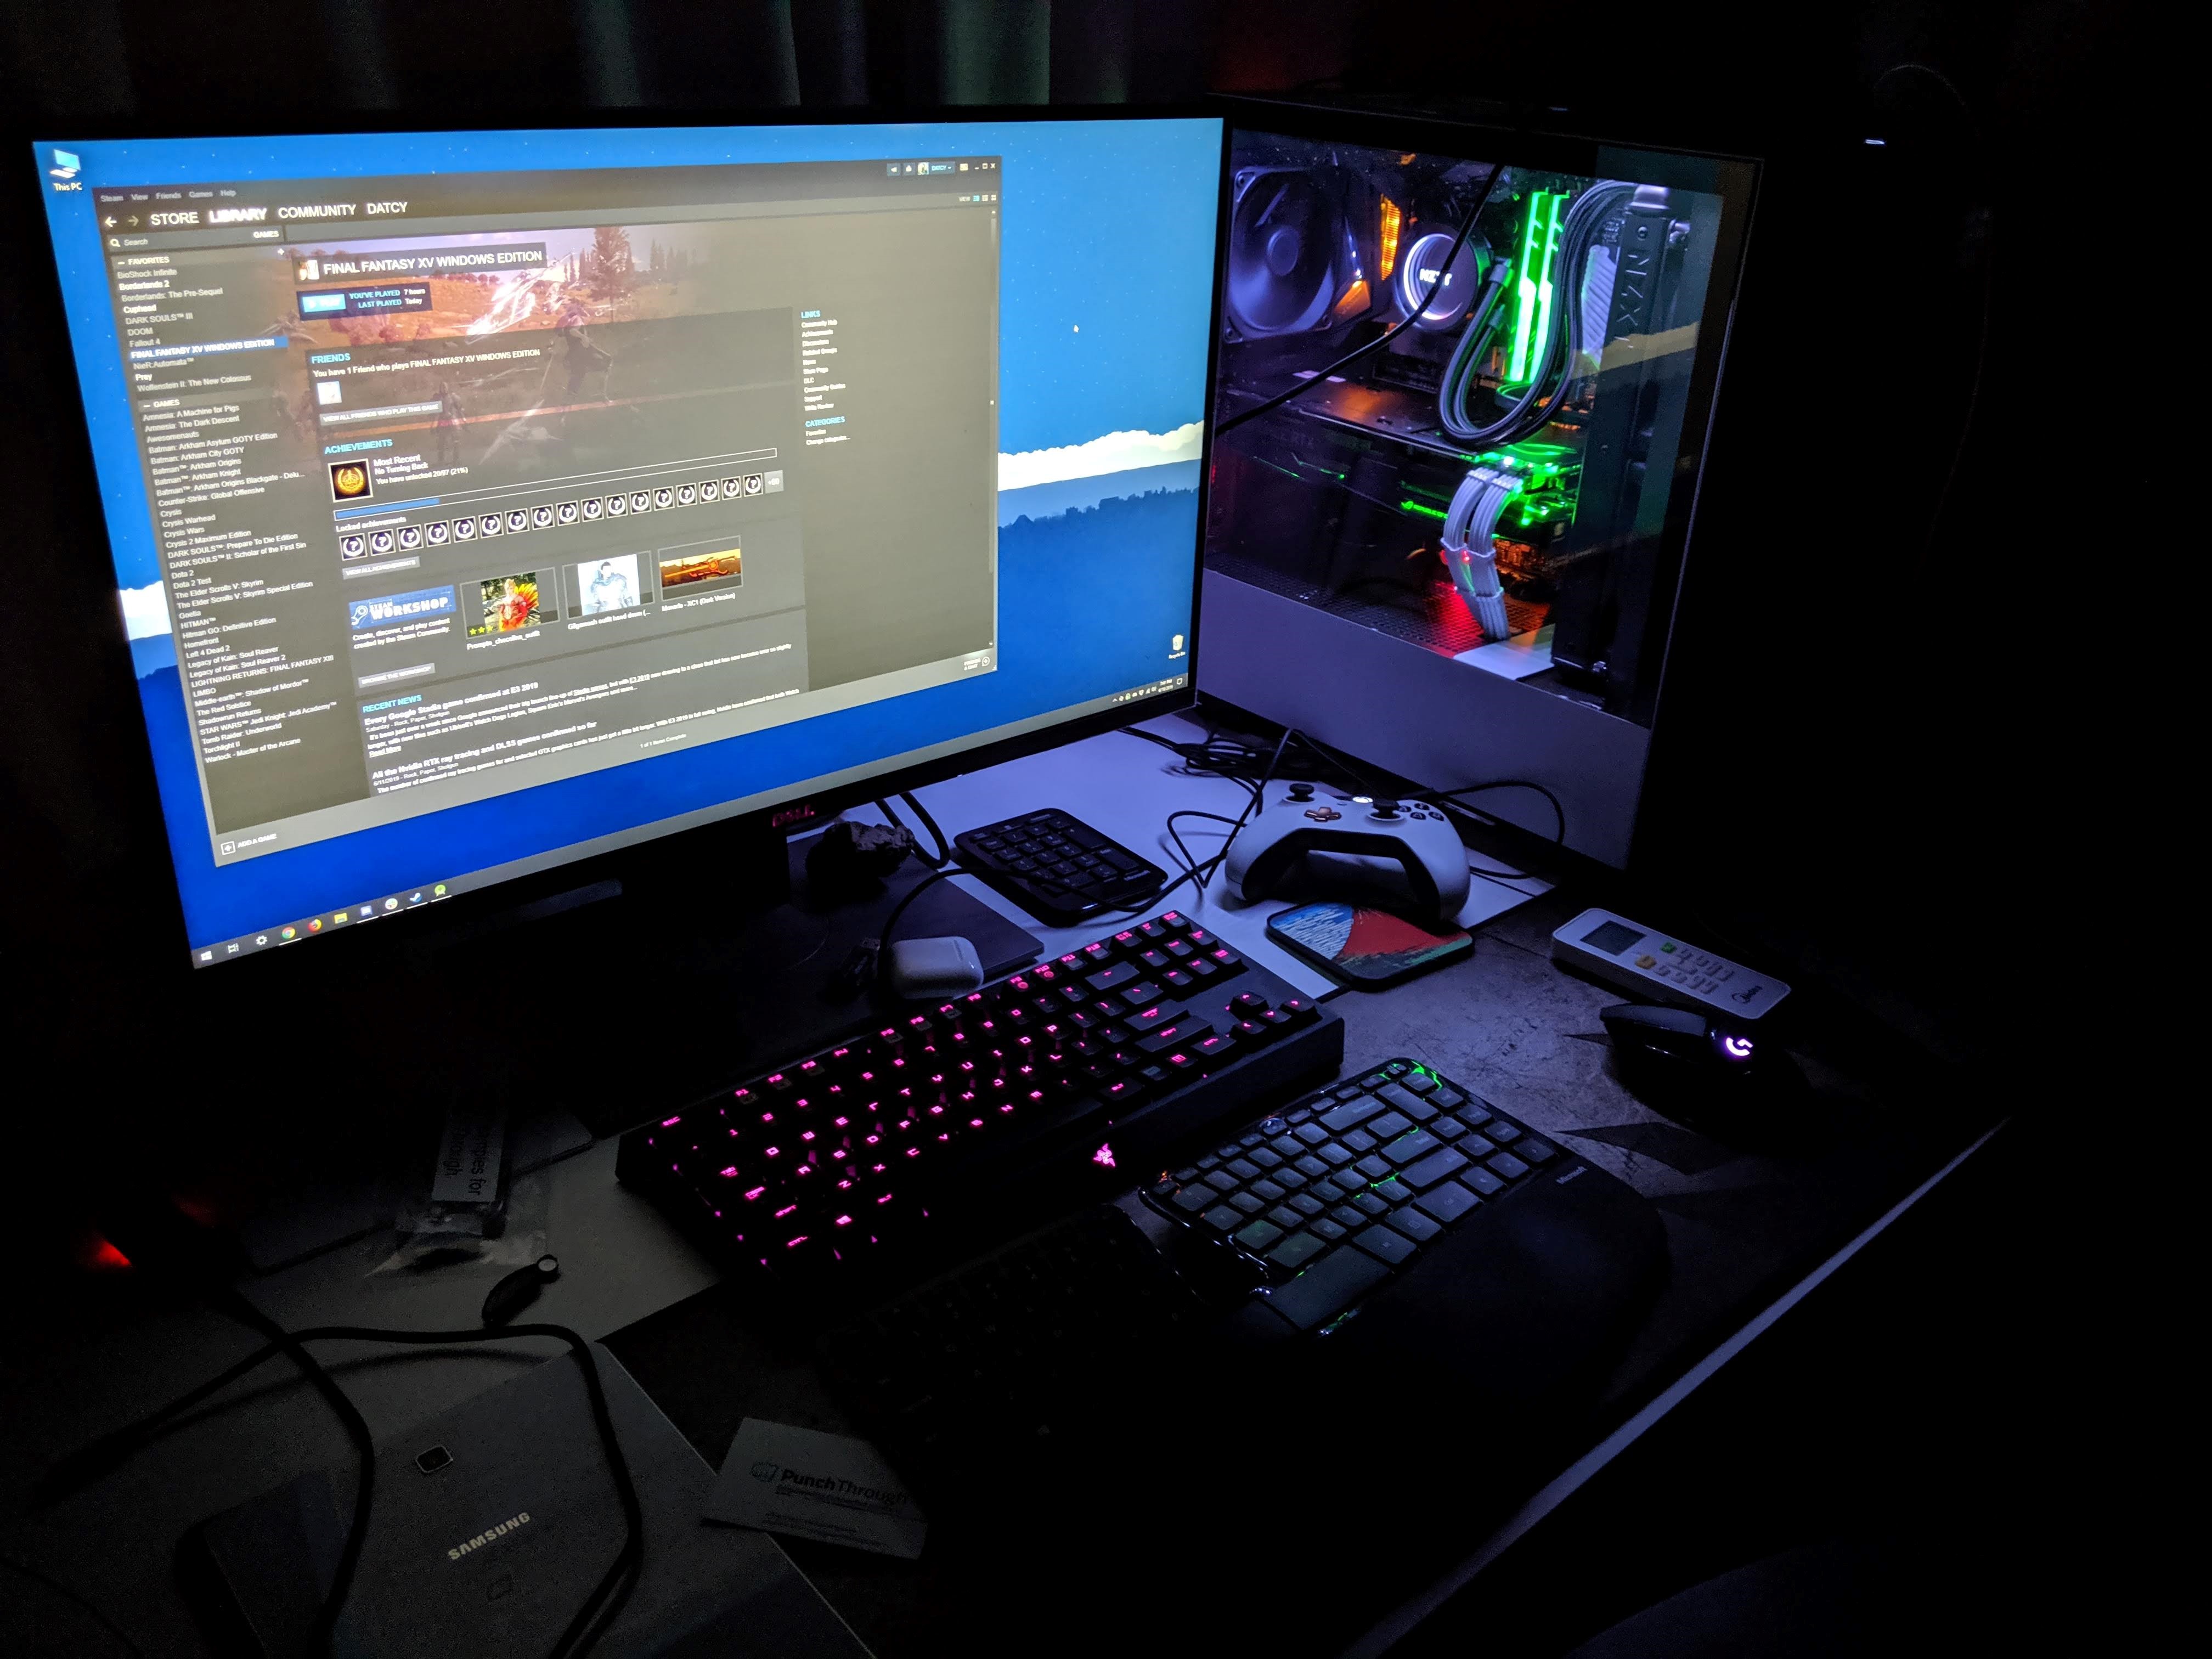
I’ve had my sights set on the NZXT cases with tempered glass side panels ever since I inherited Andre’s gaming PC a couple years back, so I went with the white H500i simply because I like the white, clean look.
Misc.
I got some cable sleeves from CableMods that replace some common PSU connectors like the ones going into the GPU, motherboard and CPU. It just makes the whole build look cleaner and organized.
I also got a new G502 LightSpeed wireless mouse to go with my new build, since I’ve always used a Magic Trackpad 2 on macOS, I wanted something wireless and apparently wireless mouse technology has gotten to a point where 1ms latency is possible, thus making it a feasible option for gaming. The only downside is that I do have to charge the mouse every few days, but it’s not a dealbreaker.
Putting everything together
Some time mid-June all the parts arrived, and I put the build together on a Saturday afternoon. I’ve built a couple of PCs before back in primary school and high school, so I’m no stranger to this but the modern PC building process has a few things that I discovered:
- Dual-channel configuration: inserting RAM sticks in dual-channel configuration gives better performance overall.
- RAM clock speed: RAM by default runs at a set clock speed like 2666 MHz, so since my RAM is rated at 3200 MHz, I had to boot into the BIOS and enable XMP profile before I was able to set the RAM clock speed to 3200 MHz.
- AIO cooler installation: this as a whole was new to me, but the instructions were simple enough to follow.
- Cable management: my NZXT H500i case has a few features like tie-down points and cable route paths that made cable management incredibly effortless.
Booting it up
To my surprise, after putting everything together, the PC POST-ed on the first attempt. Usually people would forget to plug some power connector, or they would mess something super trivial up, and that was what I was expecting, but I guess my methodical approach paid off!
I installed Windows 10, and did the usual things like running Windows Update repeatedly, installing Nvidia drivers, Android Studio, Steam (for games), etc., and I was in business by evening time.
Parting words
If you’re even half-heartedly considering building a high performance PC that you can use for work and play, I’d say go for it. There’s no better time than now, especially with Microsoft’s new approach of being very dev-friendly: they bought GitHub, introduced WSL 2 for running sandboxed Linux environments on Windows, and they’re big on dev tools like the increasingly popular VS Code.
I’ve been using this PC build for the past 2.5 months now and I have nothing but praises to sing.
Oh, and if you’re thinking of going for the aesthetics route for your build, do it.